Tuesday 29 December 2009

Sophie's Purse

This cute little vintage style purse was a quick present for my cousin Sophie who loves all things green.

Photobucket

To make your own you will need:

10cm x 5cm purse frame (this frame is a small silver frame from u-handbag for tips on using other purse frames see my notes at the end of this post)
Textile glue
Approximately 115m of DK weight yarn - I used Elle Rustica for a vintage tweed effect.
3.75mm knitting needles
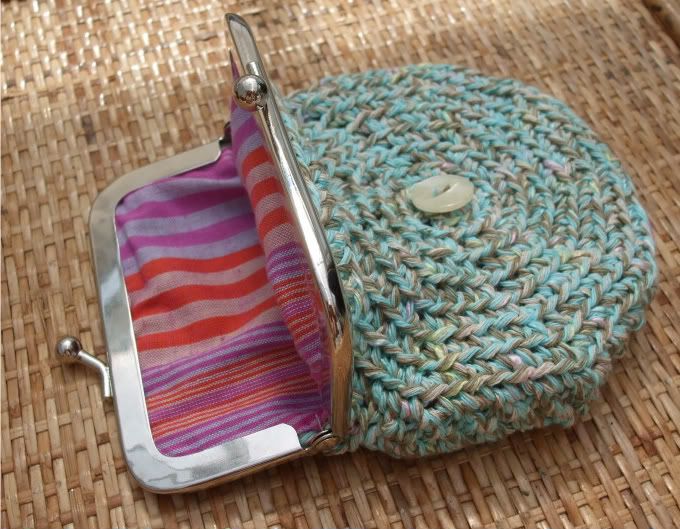
Some material for lining
Needle and thread
4mm Crochet hook or darning needle for side seams

Cast on 44 stitches. This should measure 20cm which is half the circumference of the purse frame.

Row 1: Knit
Row 2: Purl

Repeat these two rows until the piece measures approximately 8 inches.
Cast off

Fold in half with right sides facing. To join seams either slip stitch the stitches at the ends of the rows together using a crochet hook, or simply sew up the side.

Turn right side out. Using the knitted piece as a template, place on the lining material and draw around leaving approximately half an inch seam allowance. Cut two pieces of lining material the same size.

With right sides facing sew around edges with needle an thread. Place inside knitted purse piece. It is important that the lining fits really well and is the same size or even slightly bigger than the knitted exterior, since the knitting can stretch. This will make fixing to the frame much easier!

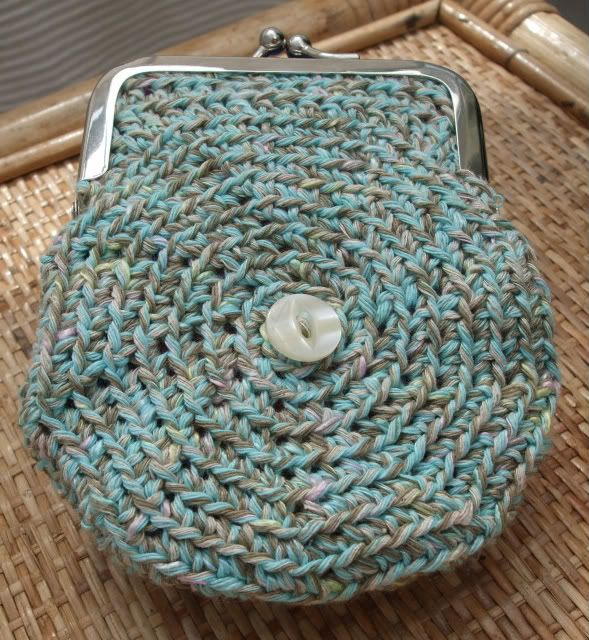
Sew the lining to the top of the purse, then fix to the frame using the textile glue. It will be much easier to fix with the frame open fully, fixing one half of the frame at a time. For tips on fixing to purse frames there is a great tutorial here

To create the shape of the purse, push the bottom corners in on themselves (they probably look a little pointy at present!) and secure with a couple of stitches.

The flower on this purse is a pattern from the Encyclopedia of Crochet by Jan Eaton called 'Frilly flower' and is secured with a vintage button from my stash.
There are many free flower patterns available to try so you can make your purse unique!

Notes on using other purse frames: To modify this pattern to suit a different purse frame simply open the purse frame fully and measure the perimeter of the frame. Divide this measurement by two and this should be the approximate width of the piece you are knitting. Simply add or subtract the number of stitches in the row to suit your gauge and the purse frame. The length of the piece you knit should be twice the depth of the finished purse. Just be aware that if your purse frame is not flat across the top then the purse will not be flat across the bottom and you may have to shape the ends of your knitting, but it would be an interesting experiment!
Photobucket


Friday 6 November 2009

Crochet Poppy

I quickly made this last night, so here is my free crochet poppy pattern. Please, if you make a poppy, make sure you also make a donation to the poppy appeal - thats all I ask!


Photobucket


You will need:
DK weight yarn
3.5mm crochet hook.
A button
Needle and thread

Gauge is not really important.

The pattern: (all crochet terms are UK)

Ch4, sl st to form ring.

1st Petal:
1. Ch 3, dtr into loop 7 times, 1 tr into loop, turn
2. Ch 2, tr in each st across, htr in last st, turn.
3. Sk 1st st. Sl st in next st, htr in next 2 sts, 2htr in next st, htr in next 2 sts, sl st in next st. End off.

Rejoin yarn to centre ch 4.

2nd Petal
1. Ch 3, dtr into loop 9 times, 1 tr into loop, turn
2. Ch 2, *1 tr in next st. 2 tr in next st, repeat from * In last st make 1tr and 1 htr. turn
3. SK next st. Sl st in next st *htr in next 2 sts, 2htr in next st. Repeat from* When 2 sts remain, dc in next st, sl st in next st. End off.

Weave in ends and sew button to centre.

Wednesday 3 June 2009

Starburst Purse

Here's a variation on the Spirale Purse using a lovely 4 ply bamboo yarn.


You will need: 3mm hook, approximately 110 metres of 4 ply yarn (I used Wendy Happy) material for lining, needle and thread, 10 x 5cm purse frame and textile glue (see spirale pattern for details)

Photobucket
Approximate Gauge: Diameter after 10 rows = xcm, 22sts = 10cm

Abbreviations: (note all stitches are in UK terminology)

st - stitch
sts - stitches
sk - skip
sp - space
sl st - slip stitch
flo - front loop only
ch - chain
dc - double crochet
htr - half treble
tr - treble
dtr - double treble
fptr - front post treble
tr2tog - treble 2 together


Pattern:

Work in a continuous in the roundfor rows 1-10.

Row 1: Ch 5, sl st to form a circle.

Row 2: Ch 3, 11tr in to circle, sl st to top of ch 3

Row 3: Ch 3, fptr around last st of previous row (the tr before the first ch 3) *tr in next st, fptr in next st of previous row. Repeat from * around ending with tr, sl st in to top of ch 3.

Row 4: Ch 3 *fptr around fptr in row below and to the right, tr in next 2 sts. Repeat from * around, tr in last st, sl st to top of ch3

Row5: Sl st to st on left of next fptr. Ch3, *fptr around fptr in row below. tr in next st, fptr in tr one to the right in row below, tr in next 2 sts. Repeat from * around, sl st to top of ch 3

Row 6: Sl st in next st. Ch 3, *fptr around fptr in row below, tr in next 2 sts, fptr in fptr of row below, sk next st, repeat from * around. After last fptr sl st into top of ch 3.

Row 7: Sl st in next 2 sts, *fptr around fptr in previous row, tr in next 3 sts, fptr around fptr in previous row, sk next st, tr in next 2 sts. Repeat from * around, after last fptr sl st to top of ch 3.

Row 8: Sl st in next st. Ch3, *fptr around fptr in previous row, sk next st, tr in next 3 sts, fptr around fptr in previous row, tr in next 3 sts. Repeat from * around. Sl st to top of ch 3

Row 9: Sl st in next st. Ch3 *Fptr around fptr in previous row, tr in next 4 sts, fptr around fptr in previous row, sk next st, tr in next 3 sts. Repeat from * around. After last fptr sl st to top of ch3.

Row 10: Sl st in next st, ch3 * fptr around fptr in previous row. Sk next st, tr in next 4 sts, fptr around fptr in previous row, tr in next 4 sts. Repeat from * around. Sl st to top of ch 3

End of working in circle. Turn work, all sts in row 11 are flo. Do not use top of fptr sts - use the four tr sts between

Row 11: Ch1, dc in next st, htr in next st, tr in next st, (dtr,ch1,dtr) in next st, tr in next 2 sts, htr in next 17 sts, tr in next 2 sts, (dtr,ch1,dtr) in next st, tr in next st, htr in next st, dc in next st, sl st in next st. End off.

Row 12: With RS facing join yarn to left corner (the ch1 space between dtr's). Ch4, dtr in next st, tr in next 2 sts, htr in next 2 sts, dc in next 12 sts, htr in next 2 sts, tr in next 2 sts, dtr in next 2 sts (last tr is in corner sp). Turn work.

Row 13: Ch3, tr in next st, tr2tog over next 2 sts, tr in next 2 sts, htr in next 12 sts, tr in next 2 sts, tr2tog over next 2 sts, tr in next 2 sts.


Making up: Follow the same method used in the Spirale purse pattern.

Photobucket


Photobucket


Tuesday 26 May 2009

Spirale Button Purse

I had a bit of free time over the weekend so I quickly put this pattern together for a birthday present. The yarn has silk through it and it just feels great.


You will need around 55 metres of aran weight yarn (I used Patons Dew) a 4.5mm crochet hook, two buttons, some material for lining, a yarn needle, a sewing needle, some thread, a 10cm x 5cm purse frame and some textile glue. (I got the frame and glue from http://www.u-handbag.com/ )


Approximate gauge: diameter after 9 rows = xcm, 16sts = 10cm to fit purse frame.
It's easy enough to adjust the purse size depending on the frame. The purse diameter can be increased by adding rows follwing the same increase of 9 sts per row (or omitting rows for a smaller diameter) and the top of the purse can be adjusted by increasing or decreasing the number of htr in the centre of row 10. For more depth add rows of dc.

Abbreviations (note all terms used in this pattern are in UK terminology):
st - stitch
sts - stitches
blo - Back loop only
Ch - chain
sl st - slip stitch
dc - double crochet
htr - half treble
tr - treble
dtr - double treble
WS - wrong side
RS - right side

Pattern:
Purse body - make 2
Ch5 sl st into 1st ch to join.
Row 1: Ch 2 (counts as dc) 8dc in circle. (9sts)
Do not join. Work rows in a spiral. Mark end of each row with a stitch marker and move up as purse progresses. All sts worked in blo.
Row 2: 2dc in each dc around (18sts)
Row 3: (Dc in next dc, 2dc in next dc) Repeat around. (27sts)
Row 4: (dc in next 2dc, 2dc in next dc) Repeat around (36sts)
Row 5: (dc in next 3dc, 2dc in next dc) Repeat around (45sts)
Row 6: (dc in next 4dc, 2dc in next dc) Repeat around (54sts)
Row 7: (dc in next 5dc, 2dc in next dc) Repeat around (63sts)
Row 8: (dc in next 6dc, 2dc in next dc) Repeat around (72sts)
Row 9: (dc in next 7dc, 2dc in next dc) Repeat around (81sts)
End of spiral rounds.
Row 10: dc in next dc, htr in next dc, tr in next dc (dtr, ch1, dtr) in next dc, tr in next 2 dc, htr in next 9dc, tr in next 2dc, (dtr, ch1 dtr) in next dc, tr in next dc, htr in next dc, dc in next dc, sl st into next dc. End off.
Row 11: With RS facing join yarn to right hand corner (ch1 sp between dtr) Ch2 (counts as dc) working in blo htr in each st across ending with htr in ch1 sp (16 htr)
Row 12: Turn work ch2 (counts as htr) working in blo htr in each st across. (16 htr) End off.

To make up the purse:
with WS facing sew around circular part of purse only. Turn the right way round. Sew a button to the centre of each side of the purse.
Fold the lining material in half and trace around purse. Cut out. With RS facing sew around circular portion of lining. Place inside the purse body and place a few sts around the open edge of purse to hold lining in place. With the textile glue, attach purse body to frame.

Photobucket


Thursday 21 May 2009

Chunky Bangle Pattern

So, I needed a space for my crochet patterns and I thought hey, why not try out this blogging malarkey, and here I am.
I'll start with something relatively simple. This pattern was originally going to be a submission for the CLF 3rd book but I sort of missed the deadline. Nevermind, here it is in all it's glory and for free too!

I like these bangles, they're comfy and they don't make a loud racket when you move your arms!


I used Rowan Cotton Rope (Aran weight) but any aran weight would do. Gauge is not important, just make sure the starting chain can fit around your wrist!

I used a 4.5mm hook, smaller than stated on the yarn, just to make the gauge tight so the bangle has more structure.


Oh and just to make things more complicated I write in UK terms!
Abbreviations:

ch: chain

dc: double crochet

sl st: slip stitch

blo: back loop only

ws: wrong side

sts: stitches


Ch 35, sl st into 1st chain to join (careful not to twist the chain!)

Row 1: Ch 1, dc in one leg of each foundation ch around. Sl st into 1st dc to join

Row 2: Work all sts in blo. Ch 1, dc in each dc around. Sl st to 1st dc to join

Rows 3 & 4: Repeat row 2

To finish, fold in half with ws facing to form bangle shape. Sl st around, joining blo of Row 4 to one leg of foundation ch. end off.


For the black and red bangle I alternated the colours each row, for the red and yellow I changed colour for rows 2&3 then back to the original colour for row 4


Happy bangling!

Photobucket