Monday 19 April 2010

Lalique Bubble Bag

Right, finally got around to posting the pattern for this cute little bag. I'm currently using mine as a make up bag. Bear with me on this one - the pattern is untested and I'm working from a few scrappy notes I made at the time. I'm going to make a couple more of these bags so that should hopefully flag up any issues.


You will need about 120 metres of super chunky yarn - I used Rowan Little Big Wool which is 5-6 wpi to give you an idea, a 9mm crochet hook and a stitch marker. Make sure your yarn has a high percentage of animal fibre and is not superwash wool otherwise it is unlikely to felt. If in doubt swatch first.

Gauge is not important with this pattern - use a lighter weight wool for a smaller bag or a heavier/double strand for a larger bag. For any yarn substitutions make sure you also change your hook size to suit.


Abbreviations (note this pattern uses UK terms)

Sl St - slip stitch
Ch - Chain
Dc - Double crochet
Htr - Half treble crochet.
Tr - Treble
Dtr - Double treble
Ttr - Triple treble
Tr2tog - Treble 2 together
FLO - Front loop only
BLO - Back loop only


Bag Side (make 2)

Ch 4, Sl St to join and form ring.
Row 1: Ch 2 (counts as stitch) dc into ring 5 times sl st to join (6dc) Mark last st and move marker up as each row is completed
Row 2: Ch 2 (counts as stitch) dc in same st. 2dc in each st around, sl st to join. (12 dc)
Row 3: Ch 2 (counts as stitch) dc in same st. *dc in next st 2dc in next st. Repeat from * around. Sl st to join. (18 dc)
Row 4: Ch 2 (counts as stitch) dc in same st. *dc in next 2 sts, 2dc in netx st. Repeat from * around. Sl st to join. (24 dc)
Rows 5-8: Continue to increase 7 sts per round as set pattern above. 48 dc at the end of row 8.
Row 9: Working in FLO htr evenly around. Sl st to join (48 htr) End off.

Row 10: Rejoin yarn to back loop of any st in row 8. All sts in this round are worked BLO. *Sl st in next 3 sts, dc in next 2sts, htr in next st, 2htr in next st, tr in next st, 2tr in next st, dtr in next st, 2dtr in next st, 2ttr in next st, 2ttr in next st, 2dtr in next st, dtr in next st, 2tr in next st, tr in next st, 2htr in next st, htr in next st, dc in next 2sts, sl st in next 3 sts. Repeat from * Sl st to join. (60 sts)

Row 11: Ch 1, Dc in same space, dc in next 3 sts, 2dc in next st, htr in next 2 sts, 2htr in next st, tr in next 2 sts, 2 tr in next st, dtr in next 8 sts, 2 tr in next st, tr in next 2 sts, 2htr in next st, htr in next 2 sts, 2dc in next st, dc in next 4 sts, sl st to join. End off (66 sts)

Bottom/Sides (make 1)

Ch 9
Row 1: Tr in 3rd chain from hook, tr in each ch across (6tr) Turn.
Row 2: Ch 3, Tr in each tr across (6tr) Turn.
Rows 3 - 20: Repeat row 2

Row 21: Ch 3 Tr2tog twice, tr in last tr. Turn
Row 22: Ch 3, Tr2tog, tr in last tr  Turn
Row 23: Ch 3 tr 2 tog. End off

Rejoin yarn to end of foundation chain at row 1 and work rows 21-23.

To make up the bag:
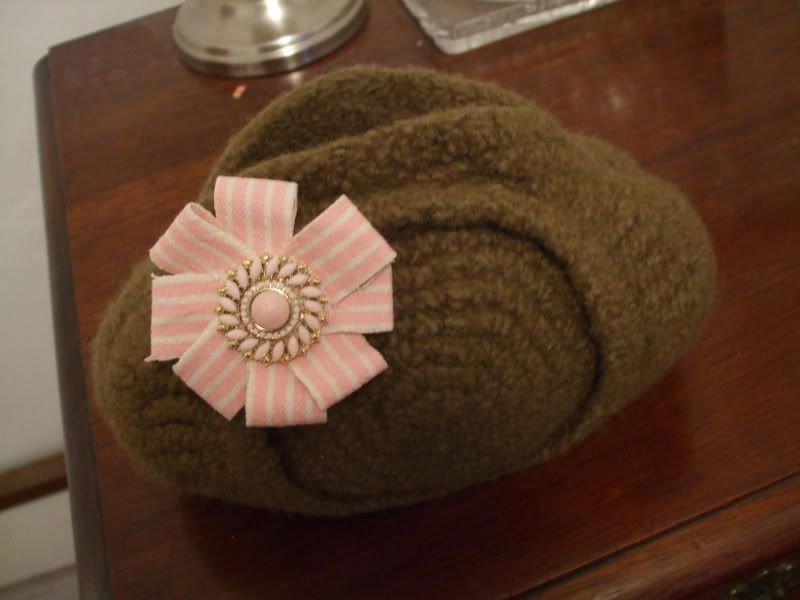
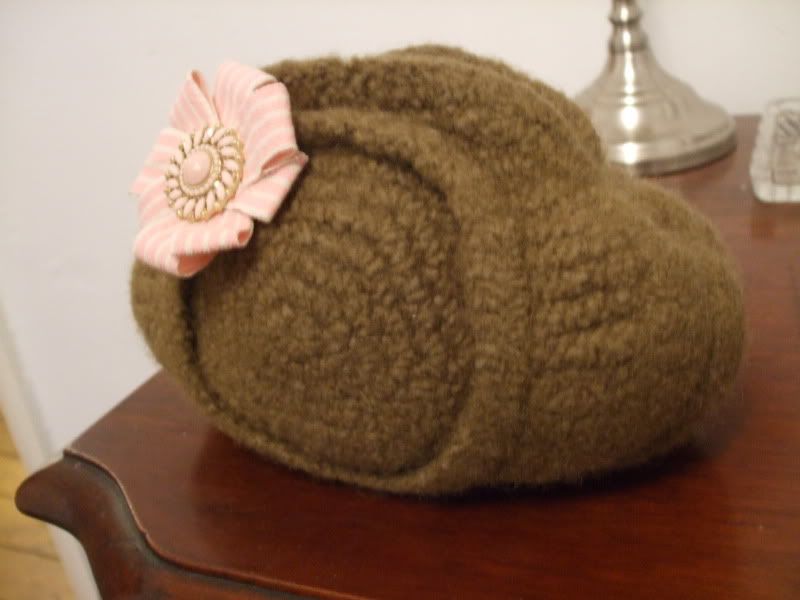
Line up the centre of the bottom strip with the centre of the bag side and pin together ( I found it easier to fix one side at a time, remember to have right sides facing when you do this which is the side with the raised front loop trebles) Starting from the centre out for eveness, Sl st the end of each of the bag bottom rows to every other bag side stitch. This creates the bubble effect. Repeat for the second side. Close the bag further with a couple of sl sts past the end point of the side piece. Turn right side out. I also added a row of htrs around the opening of the bag top. Your bag should be looking a little like this:


All thats left is to pop it in the wash to felt - I put mine in a pillow case and chucked it in with my usual washing at 60 degrees.
Lining is optional, I use mine unlined but added a magnetic snap to close.


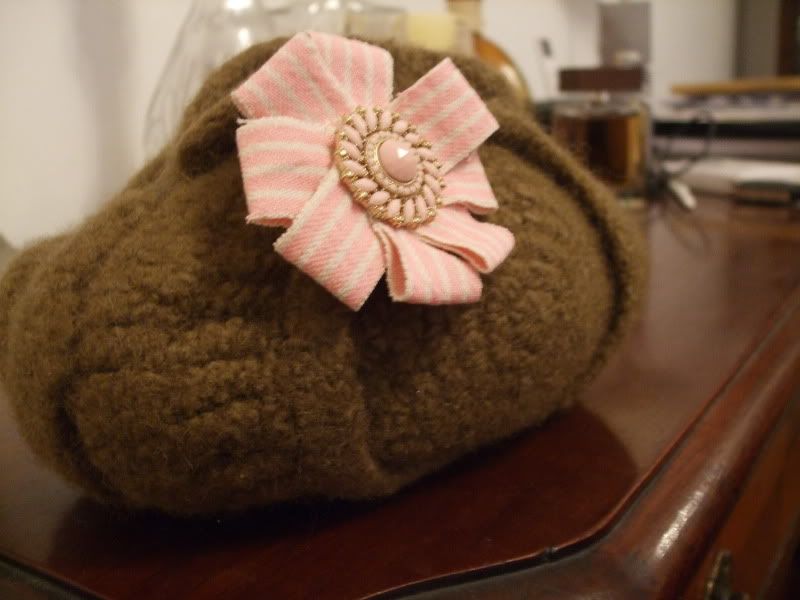
Hope you enjoy making Lalique! 


Photobucket

Sunday 28 February 2010

Lalique & The Ravelympics

For the past couple of weeks I've been busily working on my Ravelympics projects to coincide with the winter olympics over on Ravelry one of which was an original bag design inspired by a Rene Lalique ashtray!
Here are the first pictures of my finished Lalique Bubble Bag.


This little pink pin was crafted from a pair of old stripey jeans and an earing! I think it really suits the bag.


So when I get a chance I'll be writing up the pattern and in the meantime I'm working on a box bag version of the bag which will be, well, boxier!


Photobucket

Tuesday 19 January 2010

My patterns on Crochet Me

The first  patterns I ever wrote are available for free on Crochet Me. They're both headband/hat things that let you stick your hair out the top. If you don't know what I mean then you better check them out!

Bobble Head - Crochet Me

Morphy - Crochet Me

Photobucket

Sunday 17 January 2010

Spinning a Yarn....

...Literally! Today I made my first ever handspun yarn so I'm feeling rather pleased with myself. I started off with some pink fluffy stuff for practice, no idea what it was and I ended up with this

Photobucket


Not bad for a first try I thought! Then I set the twist and made my first ever skein. Ta da!

Photobucket


It's not perfect but I was feeling confident enough to dig out the shetland fibre I bought at the Manchester Yarn Day and after a bit of drafting I had a lovely pile of purple fluff (and purple hands!) So I spun that up too which was bit more difficult since the fibres seemed much more coarse than the last lot, and it's currently hanging upstairs to dry. This is the stuff, from local spinner and dyer Krafty Koala. The colourway is called Butterfly. Lovely.

Photobucket


Photobucket

So after a rather productive day I went in to the kitchen and made an apple crumble. Now that's another first!


Photobucket

Wednesday 6 January 2010

Web of Winter hat

I decided I've been spending too much time knitting recently (now that I seem to be getting better at it!) so I picked up my poor neglected hooks the other day to make myself a new winter hat, something nice and chunky and warm for venturing out in all the snow we've had.


Photobucket


You will need a 6.5mm hook and a 5.5mm hook, and approximately 160 metres of chunky weight yarn (I used James C. Brett marble chunky)

This pattern is written in UK terms

Abbreviations:
Sl st - Slip stitch
Dc - Double crochet
Tr - Treble crochet
FPtr - Front post treble crochet
FPdbltr - front post double treble crochet.
ch - chain
blo - back loop only

Using 6.5mm hook Ch 4, sl st in first ch to form a ring

Rnd 1: Ch 3 (counts as first tr), work 11 tr in ring, sl st to the top of ch 3 (12 tr total)

Rnd 2: Ch 3, fptr around post of the starting ch3 from the previous row
-tr in blo of next st, and fptr around the tr that is located one row below
repeat until you have 12 fpdc’s. sl st to the top of ch 3.

Rnd 3: Sl st into next st. Ch 3, *fptr around the post of the fptr one row below
tr in blo of next 2 sts repeat from * around, ending the
round with one tr after last fptr. Sl st to the top of starting ch 3.

Rnd 4: Sl st into next st. Ch 3, fptr around the post of the fptr one row below
*tr in blo of next 3 sts repeat from * around, ending the
round with 2 tr after last fptr. Sl st to the top of starting ch 3.

Rnd 5: Sl st into next st. Ch 3, *fptr around the post of the fptr one row below
tr in blo of next 4 sts repeat from * around, ending the
round with 3 tr after last fptr. Sl st to the top of starting ch 3.

Rnd 6: Sl st into next st. Ch 3, *fptr around the post of the fptr one row below
tr in blo of next 5 sts repeat from * around, ending the
round with 4 tr after last fptr. Sl st to the top of starting ch 3.

Rnd 7: Sl st into next st. Ch 3, *fptr around the post of the fptr one row below
tr in blo of next 3 sts, tr tog over next 2 sts, sk next st (top of FPtr) repeat from * around, ending the round with 2 tr and tr tog after last fptr. Sk next st and sl st to the top of starting ch 3.

Rnd 8: Sl st into next st. Ch 3, *fpdbltr around the post of the fptr one row below
tr in blo of next 4 sts sk next st (top of Fptr) repeat from * around, ending the
round with 3 tr after last fptr. Sk next st and sl st to the top of starting ch 3.

Rnd 9: Sl st into next st. Ch 3, *fpdbltr around the post of the fpdbltr one row below
tr in blo of next 4 sts sk next st (top of Fpdbltr) repeat from * around, ending the
round with 3 tr after last fptr. Sk next st and sl st to the top of starting ch 3.

Rnds 8-13: Repeat rnd 9

Rnd 14: using 5.5mm hook ch1, dc in each st around. Sl st to join

Rnd 15: Repeat rnd 14

Rnd 16: ch 1 *dc in next 8 sts, dc tog over next 2 sts. Repeat from *around sl st to join.

Rnd 17: ch 1 dc in each st around.

Rnds 18-24: Repeat rnd 17

End off and enjoy!

Photobucket
Photobucket


Tuesday 29 December 2009

Sophie's Purse

This cute little vintage style purse was a quick present for my cousin Sophie who loves all things green.

Photobucket

To make your own you will need:

10cm x 5cm purse frame (this frame is a small silver frame from u-handbag for tips on using other purse frames see my notes at the end of this post)
Textile glue
Approximately 115m of DK weight yarn - I used Elle Rustica for a vintage tweed effect.
3.75mm knitting needles
Some material for lining
Needle and thread
4mm Crochet hook or darning needle for side seams

Cast on 44 stitches. This should measure 20cm which is half the circumference of the purse frame.

Row 1: Knit
Row 2: Purl

Repeat these two rows until the piece measures approximately 8 inches.
Cast off

Fold in half with right sides facing. To join seams either slip stitch the stitches at the ends of the rows together using a crochet hook, or simply sew up the side.

Turn right side out. Using the knitted piece as a template, place on the lining material and draw around leaving approximately half an inch seam allowance. Cut two pieces of lining material the same size.

With right sides facing sew around edges with needle an thread. Place inside knitted purse piece. It is important that the lining fits really well and is the same size or even slightly bigger than the knitted exterior, since the knitting can stretch. This will make fixing to the frame much easier!

Sew the lining to the top of the purse, then fix to the frame using the textile glue. It will be much easier to fix with the frame open fully, fixing one half of the frame at a time. For tips on fixing to purse frames there is a great tutorial here

To create the shape of the purse, push the bottom corners in on themselves (they probably look a little pointy at present!) and secure with a couple of stitches.

The flower on this purse is a pattern from the Encyclopedia of Crochet by Jan Eaton called 'Frilly flower' and is secured with a vintage button from my stash.
There are many free flower patterns available to try so you can make your purse unique!

Notes on using other purse frames: To modify this pattern to suit a different purse frame simply open the purse frame fully and measure the perimeter of the frame. Divide this measurement by two and this should be the approximate width of the piece you are knitting. Simply add or subtract the number of stitches in the row to suit your gauge and the purse frame. The length of the piece you knit should be twice the depth of the finished purse. Just be aware that if your purse frame is not flat across the top then the purse will not be flat across the bottom and you may have to shape the ends of your knitting, but it would be an interesting experiment!
Photobucket


Friday 6 November 2009

Crochet Poppy

I quickly made this last night, so here is my free crochet poppy pattern. Please, if you make a poppy, make sure you also make a donation to the poppy appeal - thats all I ask!


Photobucket


You will need:
DK weight yarn
3.5mm crochet hook.
A button
Needle and thread

Gauge is not really important.

The pattern: (all crochet terms are UK)

Ch4, sl st to form ring.

1st Petal:
1. Ch 3, dtr into loop 7 times, 1 tr into loop, turn
2. Ch 2, tr in each st across, htr in last st, turn.
3. Sk 1st st. Sl st in next st, htr in next 2 sts, 2htr in next st, htr in next 2 sts, sl st in next st. End off.

Rejoin yarn to centre ch 4.

2nd Petal
1. Ch 3, dtr into loop 9 times, 1 tr into loop, turn
2. Ch 2, *1 tr in next st. 2 tr in next st, repeat from * In last st make 1tr and 1 htr. turn
3. SK next st. Sl st in next st *htr in next 2 sts, 2htr in next st. Repeat from* When 2 sts remain, dc in next st, sl st in next st. End off.

Weave in ends and sew button to centre.